>>> CLEANING UP YOUR SIDEBAR FIRST
After uploading your new template the widgets that should at least be in your sidebar are:
• Image widget – this is for your welcome image
• HTML widget 1 – this is for your social icons
• HTML widget 2 – this is for your search bar
• Favorite Posts – will show a number of your most popular posts
• Email Subscription – this is where readers can subscribe to your blog via email
• Blog Archive – this will display an archive list of your blog posts
• Instagram widget – in some templates this widget is not found in the sidebar but in the footer bar
This is what the sidebar should look like with the widgets that come with the template:

If you already have a blog that has sidebar widgets, these widgets will still be there after installing the new template, but they will probably be moved to the menubar section as I mentioned earlier during the menubar configuration. You can put them back in the sidebar by dragging them from the menubar area into the sidebar area. Then push the orange ‘save arrangement’ button on top of the screen to set their positions in the sidebar again.
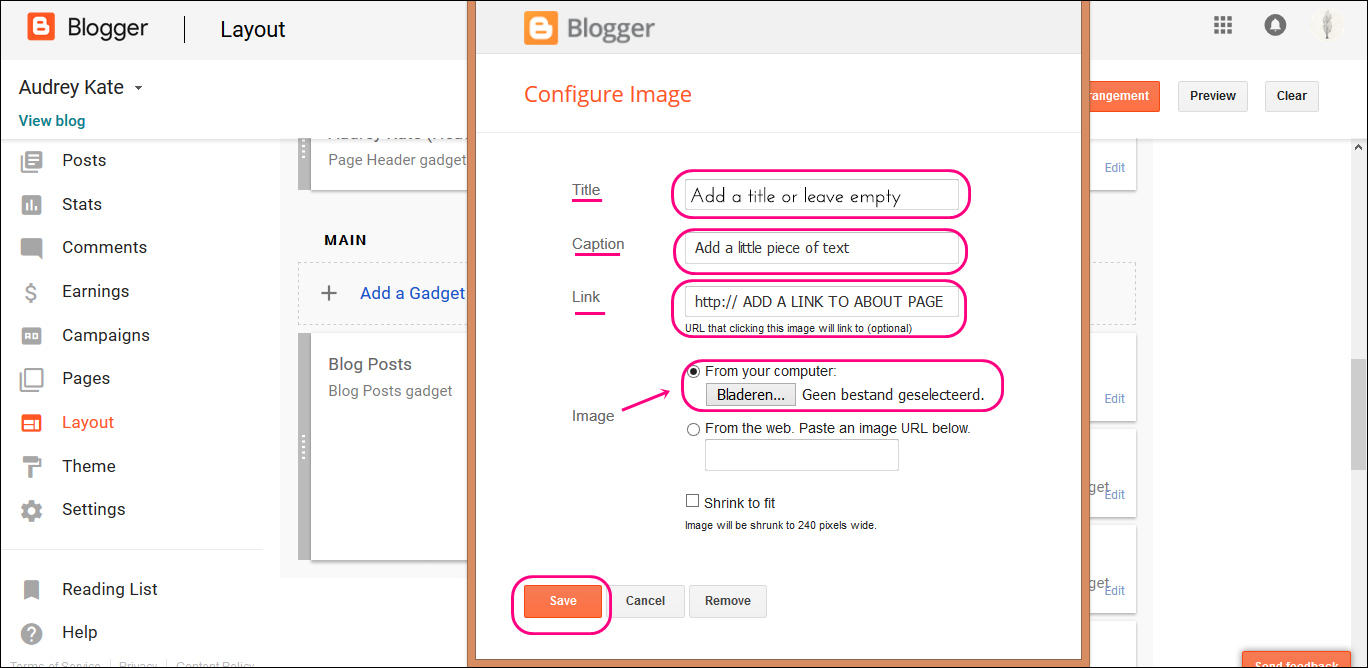
>>> UPLOADING YOUR SIDEBAR IMAGE
1. Go to section Layout and open the ‘Image’ widget
2. Remove the demo image that is still there by clicking 'remove image'

3. Upload an image of your choice from your computer (use an image of at least 280 pixels wide to use the whole width of the sidebar)
4. You can add some information about yourself in the Caption box if you wish
5. You can add your about page's URL in the Link box if you want your photo to link to the about page
6. You can add a title above your image if you want, but you can leave that option empty as well.
7. Save the widget
>>> INSTALLING YOUR SOCIAL ICONS
1. Go to section Layout and open the first HTML/JavaScript widget underneath the ‘Image’ widget
2. Remove all the coding that is inside the widget
3. Then copy the entire code from the social icons widget that you created for your menubar
4. Paste this code in the HTML widget
5. Save the widget (no title is needed for this widget)
>>> INSTALLING THE SEARCH BAR
1. Go to section Layout and open the second HTML/JavaScript widget
2. Check if the coding for the search bar is already in the widget
3. In case the coding is missing, just copy the code that you find in the Search Bar HTML Code (you will find this code in a text document in the zip-file you downloaded through Etsy)
4. Paste this code inside the second HTML/JavaScript widget
5. Save the widget (no title is needed for this widget)

In case you are not able to find the second HTML/Javascript widget, you can easily create one:
1. Just click on the option ‘Add a Gadget’ above your sidebar in section Layout
2. Select the HTML/Javascript gadget
3. Paste the search bar code into it
4. Save it
5. Then drag the widget to the position in the sidebar that you want it to appear
6. Don't forget to save the new arrangement with the orange button on top of the screen
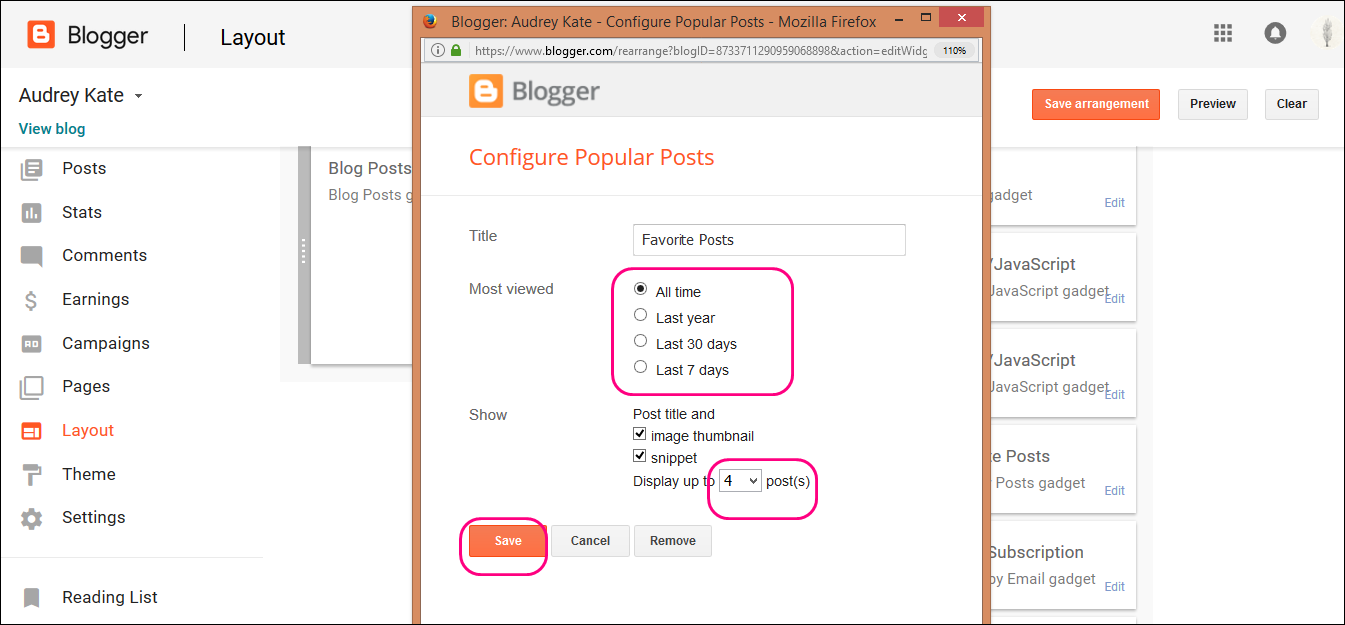
>>> THE FAVORITE POSTS WIDGET
To set up the favorite post widget:
1. Go to section Layout and open the Favorite Posts widget
2. In "Display up to x posts" select an even number (2, 4, 6, 8 etc.)
3. Select from which time period you want to show posts
4. Save the changes
>>> ACTIVATE THE SUBSCRIBE WIDGET
1. Go to section Layout and open the Email Subscription widget
2. Click on "View stats and learn more."

3. A screen from Feedburner will open (this might take a few minutes, it’s not always that fast unfortunately)
4. click on your feed (name of your blog)

5. Go to Publicize (on top)
6. Then select Email subscriptions (on the left)

7. If it's not yet activated, click on Active (you have to scroll down the page to find the activate button.

8. After activating, exit the Feedburner page and save the widget
>>> THE BLOG ARCHIVE WIDGET
This widget displays the archive of your blog posts. You can change its appearance by:
1. Going to section Layout
2. Open the widget by clicking on 'edit' button
3. Now you can change the title, appearance and time frame if you wish

>>> ADDING MORE WIDGETS TO THE SIDEBAR
1. Go to section Layout
2. Click on "Add new Gadget" (above all the sidebar widgets that are already there)

3. Now you can select and install a widget of choice

4. After the widget is created you can drag it to a position of choice in the sidebar
5. Make sure to push the orange ‘save arrangement’ button to lock its position